Saturday, June 27, 2026

Coffee Ice Cream Pie


Truth:  I'm not a very good baker.  It's tedious and precise and I don't have the patience for it:  candy thermometers, scales, sifters, leveling, and I'm not even really sure what blind-baking is.  Aaarrgghh....It's too much.  I only know how to make 4 or 5 desserts, and this is one of them.

It's softened ice cream in a pan with a no-bake crust.  Foolproof.  Then it sits in the freezer for a few hours by itself while you do...whatever.  But what are you not doing?  Sifting, leveling, or that blind baking thing.

The one thing I do know is that this pie is the perfect way to end your summer meals--with something easy, cool, and delicious.  It's gonna be a great nine weeks!  :)

---------------------------------------------------
(WHAT YOU WILL NEED)

24 oreo cookies, crushed into crumbs
1/4 cup butter, melted + some to grease the pie pan
pinch sea salt
1/2 cup sliced almonds, toasted
square of semi-sweet baking chocolate
1 quart coffee ice cream, softened (I use Haagen-Dazs)
pie plate


First toast the nuts:  put them in a small skillet on the stove over med-low heat and shake them periodically.  They are done when they start to brown and smell nutty (they go quick so keep an eye on them).  Remove from heat and place in bowl.  Set aside.

toasted almonds

Grease your pie an.
Mix cookie crumbs and melted butter in bowl.  Empty into pie pan and press in bottom and up sides to make a crust.  Sprinkle a pinch of sea salt on the bottom and place in freezer to set, approx. 30 minutes.


Remove from freezer and spread softened ice cream over the crust.  Sprinkle with almonds, and grate some chocolate over the top.  Place in freezer, covered, for a few hours until the ice cream freezes again. When ready to serve, let soften on the counter for a few minutes and slice into wedges.


* first published 2019

Saturday, May 30, 2026

Tostadas


 It's rainy and sad here today on the Gulf Coast of Florida, and what gets rid of sad faster than mexican food?  Nothing.  It's impossible to be in a bad mood with a pitcher of margaritas nearby.  Impossible! 

So I pulled out this tostada shell recipe to cheer us all up and whadya know--smiles all around!   I KNEW it! 

ps:  margaritas optional, but highly recommended :)

-------------------------------------------------------------------------

WHAT YOU WILL NEED

(Making tostada shells this way tastes so much fresher than buying them pre-packaged and it's so easy you'll never go back)

Enough corn tortillas to feed your guests.  I bought 30 for $2.98 at my local grocery store

vegetable oil

salt

Optional toppings:  I like refried beans, taco meat, diced tomatoes, shredded iceburg lettuce, shredded cheddar, and a cantina-type salsa, but the possibilities are endless


Heat oven to 400 degrees.

Place tortillas on cookie sheet and lightly brush oil on both sides, sprinkle with salt.

Bake for 6 minutes, turn over and bake another 6 minutes


  Serve with your favorite toppings  

Saturday, May 16, 2026

Artichokes


Growing up, artichokes were a big treat in the Spring.

With the weather turning hotter but the evenings still enjoyable, before the on-set of oppressive summer heat here on the Gulf Coast that keeps you inside until October, my mother would make them for dinner and we would take them onto the back porch and eat them by the pool...leaf by leaf...talking and laughing...about nothing really...listening to the crickets and the distant rumble of thunder that would bring the steamy rain.  She worked always, so it was enjoyable to have her all to myself, and those times were really savored and special to me, and still are.

I still eat artichokes with my mother, but now I make them for HER, the back porch and pool are mine, and MY daughter joins us.  Talk about savored and special...these really are the best of times  :)

--------------------------------------------------
(WHAT YOU WILL NEED)

1 globe artichoke per person
1 lemon, cut in half
a wedge of parmesan cheese (both for eating and grating)
kitchen scissors

Sauces for dipping:  it's most popular to have them with a lemony butter sauce, but my mother likes blue cheese dressing and I like to dip them in buttermilk ranch dressing.  Buy your favorites.

** (If making butter sauce:  combine some melted butter, a pinch of garlic powder, and a squeeze of fresh lemon.  Mix together.)

Cut the bottom stem off the artichoke. 


Then cut the top off so that it's flat, not pointed.
Now go around each leaf with your scissors and trim off the pointy tip.  Rub the cut side of the lemon over the top so it doesn't turn brown.


In a large pot, let water just come up to a slow rolling boil, squeeze the lemons into the water and place in pot with artichokes.


Turn down heat and let simmer, covered, for approx. 50 minutes.  They will be done when you can insert a knife into the bottom easily with no resistance.

Drain in a colander and let sit upside down for a few minutes to drain and to cool down so you can handle them.  Place on plate with sauce(s) for dipping.  

I like mine with some parmesan cheese on the side, and a cold rose'

If you've never eaten them before and don't know how, that's okay:  pull off one leaf, dip into sauce, and pull the bottom meaty part between your teeth.  The closer you get to the middle, the more tender the leaves will be and sometimes you can eat the whole thing.  When you run out of leaves, you will get to the choke--it's bristly and thistley and needs to go away!  Scoop it out with a spoon...and there you have it...the promised land.  What all your hard work was for...the heart.  Aptly named because it's the sweetest and best part :) 

artichoke heart


*first published May, 2019

Thursday, May 7, 2026

Brunch Casserole: baked pasta with smokey bacon & peas


A pasta casserole of thick cut smoky bacon, baby peas, and parmesan cream sauce, baked in the oven until crispy on top and bubbly hot and gooey on the inside, finished with cracked black pepper.  My daughter says it "gives carbonara"--and she's right it does, but without the hassle.  

This is good on it's own as a light lunch, but paired with a platter of scrambled eggs and chives, and some store-bought pastries and fruit, it's the easiest thing you can do for a Mothers Day brunch, and she will love you.

And because of the carbonara vibes, it goes amazingly well with a pitcher of bloody marys--just sayin' :)

-------------------------------------------------------------

WHAT YOU WILL NEED

1 pound round pasta, such as ziti rigate or small rigatoni

6 slices thick-cut bacon, cut crosswise into lardons

1 jar of your favorite alfredo sauce

1/2 bag (approx 8 ounces) frozen baby peas

1/2 onion, chopped

parmesan cheese, grated

1/2 stick butter, cut into indiv pats, plus a little more to grease the pan

salt/cracked black pepper/garlic powder

White wine

Chicken broth


Heat oven to 350 degrees.  Grease a 9x13 casserole dish with butter.

Cook pasta until just al dente--it will continue to cook in the oven and you don't want it to be mushy.  While that's cooking...

Fry bacon, drain grease except for 1 tbs. and set aside.  In this pan, saute onion in 1 tbs bacon grease.  When browned, add jar of sauce, some white wine and chicken broth (how much is up to you, it depends on how wet your casserole to be.  I'd start with a half cup of wine and 3/4 cup broth and go from there).  Cook on low heat until warmed through and the flavors come together.

When pasta is ready, drain and place in buttered casserole dish, and lightly sprinkle salt/pepper/garlic powder over the top.  Add frozen peas, bacon and sauce, mix until combined.  Sprinkle generously with grated parmesan, and put pats of butter over the top. 

Bake for 40 minutes:  15 minutes covered, and 25 minutes uncovered.


Serve, seasoned with finishing salt and pepper as necessary--


Friday, July 25, 2025

Mango Salsa


This refreshing mango salsa goes with all the grilled meats, so no matter what you're serving, it works like a charm.  You can serve it all summer--

--------------------------------------------------
(WHAT YOU WILL NEED)

2 or 3 mangos, diced
1/4 of a red onion, diced
1 handful fresh cilantro, chopped
1 jalapeno pepper, seeded and chopped
juice of 1 lime, plus another lime reserved for finishing (2 limes)
1 red bell pepper, chopped
salt/pepper


 my jalapeno plant

Stir all in bowl and chill in refrigerator.  Before eating, stir and season with a little salt and pepper to taste, and another squeeze of fresh lime juice. 

Last night I served it with grilled fish ~


* first published March 2020

Sunday, May 25, 2025

Pineapple Jalapeno Margarita


You can make a pitcher of these for a crowd, or just a single drink for yourself.  Or a pitcher for yourself, nobody's judging.
 
They have a sweet, salty, spicy heat that screams summer, but with an unexpected, mischievous twist.  And tequila.  Really, do you need any more convincing? 

--------------------------------------------
(WHAT YOU WILL NEED)

1  59-ounce container of "Pineapple Orange" juice (I use Dole—it lives in the refrigerated section of my grocery store, by the produce)

1 1/2 or 2 cups of your favorite tequila

1 or 2 fresh jalapeno peppers, unseeded, sliced into thicker wheels 

fresh pineapple, cut in bite-size chunks

kosher salt

ice

pitcher

Note:  I garnish each drink by itself, because if you add the sliced jalapenos to the pitcher, the drink becomes too spicy as it sits, and the pineapple will break apart.

Mix container of juice and tequila in pitcher and keep cold until ready to serve.
Rim glass with salt, pour drink over ice, add jalapeno slices and pineapple to your drink and serve.


* first published 5/24

Monday, February 17, 2025

Oven Pasta Bake: chicken, radicchio, mushrooms, & fontina


On Sundays at my house, we eat dinner early so we can get ready for the week ahead.  I like to make this in the afternoon, and set it out with plates and silverware in the kitchen--it can be eaten as a late lunch and again later if you're still hungry.  We serve ourselves, and everyone eats when they want to.  It also comes together quickly so it's a great weeknight meal.

The variations on this are endless.  If you want to be totally decadent, you can add crumbled blue cheese when you mix it before baking, but it's so rich I only do it when we're eating it with other dishes. I've also substituted peas and cooked bacon for the spinach and chicken, and found that it's an excellent side dish if you leave out the chicken entirely.  In every way, it's good with a dry white wine :)

------------------------------------------------------

WHAT YOU WILL NEED:

1 lb. box of pasta (bowtie or ziti rigate), cooked and set aside 

2 small heads radicchio, sliced in ribbons like you would for coleslaw

1 lb. mushrooms, sliced

1 jar of your favorite alfredo sauce

fontina cheese, grated (approx 2 cups)

parmesan cheese (the green can is fine for this)

1 bag fresh spinach

1/2 cup white wine

1/2 cup chicken broth

approx 3 tablespoons butter, plus more for the pan

the breast of one whole rotisserie chicken, shredded

salt/pepper/garlic powder

9x13 baking pan (if you have one of those aluminum disposable ones, even better)

shredded radicchio

Heat oven to 350 degrees and butter your baking pan.

In a deep-sided skillet, saute mushrooms, spinach, and radicchio in butter until mushrooms are browned and vegetables are wilted a little.  Add alfredo sauce and mix.  Add some white wine and chicken broth to the jar, cover, and shake to get the remainder of the sauce.  Add to the pan and simmer on low to marry the flavors, this is your sauce. Sprinkle with salt/pepper/and garlic powder to taste.

When everything is cooked down and incorporated:  add pasta, half of the fontina cheese, shredded chicken, and the sauce to the baking pan and mix so that all is incorporated evenly.  Sprinkle the remainder of the fontina on top with parmesan cheese to cover.  

ready for the oven

Bake uncovered for approx 45-60 minutes, until hot all the way through.  The top will be crusty and the inside will be moist and delicious.  If you don't want a crusty top, bake it covered.

Serve on a plate with more parmesan, salt, and pepper


Wednesday, January 15, 2025

Spicy White Chicken Chili


Enjoying the winter weather isn't always about hot chocolate and plaid blankets ;) 

------------------------------------------------
(WHAT YOU WILL NEED)

SERVES 6

This whole pot of chili takes maybe an hour, including cooking time.  So easy-- 

Olive Oil
3 large boneless, skinless chicken breasts--cut into bite size pieces
2  1/2 teaspoons Cumin
2  1/2 teaspoons Chili Powder
2  1/2 teaspoons Garlic Powder
1 teaspoon dried Oregano
salt/cracked pepper
butter
2 small yellow onions, diced
2 cloves fresh garlic, minced
2 small cans (4 ounces each) fire roasted and diced green chilies
1/2 cup all-purpose flour
4 + 3 = 7 cups chicken broth
2/3 cup salsa verde
2 teaspoons Sriracha
2  15.5 ounce cans white cannellini beans, rinsed and drained
3 tablespoons sour cream
1 1/2 cups white rice
garnish:  chopped green onions, freshly shredded Monterey Jack cheese (not pre-packaged, it doesn't melt as well)


Cook rice:  use 3 cups chicken broth and 1 1/2 cups white rice

Drizzle olive oil and melt one tablespoon butter in large soup pot/dutch oven.
Combine the chicken with cumin, chili powder, and garlic powder in a large bowl.  Add chicken to the pot and saute until almost done. Remove from pot and set aside.


Heat another tablespoon butter in the pot, add onions and cook until tender.
Add minced garlic and green chilies into the pot.  Stir together and cook for a few minutes. Sprinkle the flour over the onions, stir, and cook briefly for a few minutes.  Add remaining 4 cups chicken broth one cup at a time, stirring each time until smooth.
Add the salsa verde, sriracha, oregano, and beans to the pot.  Allow the mixture to come back up to a simmer and add the chicken back to the pot.  Simmer for a few minutes on low and slowly stir in the sour cream, one tablespoon at a time.
Serve with white rice and garnish with green onions, freshly shredded cheese, and cracked pepper.  Sprinkle salt on top if needed.


(first posted 2017)

Sunday, December 29, 2024

New Year Brunch: charcoal grilled ribeyes, seasoned fried eggs, and parmesan roasted asparagus with garlic-rubbed toast


I usually make this on the first weekend of the new year.  By then, you've had time to shake off the haze from New Years Eve and you can turn your attention to the 364 days that remain:  impossible resolutions already discarded for doable ones; possibilities and opportunities abound in front of you.  Time to sit down and contemplate your next move. Let it be brunch.

It’s classic steak and eggs, but so much better:  charcoal grilled ribeyes, seasoned fried eggs, and parmesan roasted asparagus, with garlic-rubbed toast to get every last bit of yolk (and goodness) on your plate.  Serve it with a chilled bottle of bubbly prosecco to usher in your fabulous new year and 2025 isn’t starting out so bad. 

Stick with me, kid…I know things :)

----------------------------------------------------
(WHAT YOU WILL NEED)

serves 2

2 ribeye steaks 
1 pound asparagus, trimmed
2 eggs
1 baguette
1 garlic clove, peeled and cut flat on one side
1/2 tablespoon butter
grated parmesan cheese
olive oil
salt/pepper/garlic powder
seasoned salt (I use Lawry's)
charcoal (if you want to use a propane grill, that works too!)


Light charcoal and prepare grill.
Preheat oven to 350 degrees


Rub steaks with a little olive oil, and season with salt/pepper/garlic powder.  Cut baguette into slices and drizzle with olive oil.  Set aside.

Drizzle olive oil on asparagus and toss to coat.  Season with salt and pepper.
Roast in 350 degree oven until crisp tender, approx 25 minutes depending on how thick the stalks are.  When done, sprinkle with parmesan cheese.

roasted asparagus

In the meantime, grill steaks (I like mine medium rare) and bread.  The bread only takes a few minutes, just enough to get nice char marks.   When done, remove and cover the steak to rest while you make the eggs.  Rub one side of the grilled bread with the cut garlic clove. 

Melt butter in non-stick pan.  Make fried eggs.  While eggs are cooking, sprinkle with seasoned salt.


Assemble all on plate, open your chilled prosecco, and serve


(first published 12/20)


Sunday, November 24, 2024

Warm Citrus Olives


Let's switch gears a little.  Now that we're into full-on Fall and headed into the Winter months, we're doing more cozy cuddly things inside that warm us all the way through.  This cocktail snack is just that.  It pairs nicely with your favorite seasonal drink, and keeps in the refrigerator, to be heated up for next time.  That's if you have leftovers...which you won't :)

----------------------------------------------------

WHAT YOU WILL NEED

16 ounces of your favorite olives, drained (I use Castelvetrano and Kalamata) - pitted or not is fine, either works

1 orange (you will need the peel and the juice)

3 garlic cloves, peeled and smashed with the back of your knife

fresh thyme

1 teaspoon red pepper flakes

pinch black pepper

1/4 cup extra virgin olive oil

optional:  3 ounces goat cheese and crusty bread


Warm olive oil in a pan over low heat.  

Peel one half of the orange with a vegetable peeler and zest the other half.  Add to the oil, with the red pepper flakes, garlic, pepper, and thyme. Cut orange in half and squeeze the juice into the oil.  Stir and heat slowly for approx 10 minutes so the oil infuses.

When warm and redolent with the delicious smell of orange, add the olives and continue to heat over low, stirring occasionally, to combine.

When ready, add mixture to bowl(s) and serve with cocktails.

Or you can also serve it like this, with some crusty bread and goat cheese nestled in the middle.  If you do it this way, spoon the warm garlicky orange oil over the cheese so you can get all the goodness onto your bread, like this:


(first published 12/3/22)


Sunday, September 8, 2024

Crab Puffs


The cocktail hour.  It's so civilized--small bites, refined drinks, scintillating conversation, background music, 5:30 in the evening at the end of a long day before you settle in for dinner.  Manhattan, gin, vodka martini, or wine, these crab puffs are the perfect accompaniment to whatever you're drinking.  They're cheesy, buttery, garlicky goodness, hand-held and gone in 2 bites so you can pick up another. and another.  and another.  and still continue to sparkle with your subtle humor and witty remarks, fast and furious with your quips and bon mots.  Oh brother, these crab puffs are gonna be the second best thing at your party :)


-----------------------------------------
(WHAT YOU WILL NEED)

makes 96 crab puffs


12 English muffins, split (do not toast)
2 sticks butter, softened
2 jars cheese spread (I use Kraft Old English cheese spread)
2 cans crabmeat, drained
2 teaspoons mayonnaise
1 tablespoon seasoned salt (I use Lawry's)
1 tablespoon garlic powder
ziplock bags, for freezing

Mix together cheese, butter, mayonnaise, seasoned salt, and garlic powder in bowl.

Add drained crabmeat to bowl and mix all.

Split English muffins.  Spread mixture on muffins.  Cut into quarters and freeze in ziplock bags until ready to use.

When you want them, take a bag out of the freezer and bake on 400 degrees for 15-20 minutes.  I have 2 in my freezer right now:


in my freezer with the other constants in there:  limoncello, gin, and a cannister of shelled Diamond walnuts (so good for snacking on while making dinner)


* First published 9/22/19
Sunday, July 21, 2024

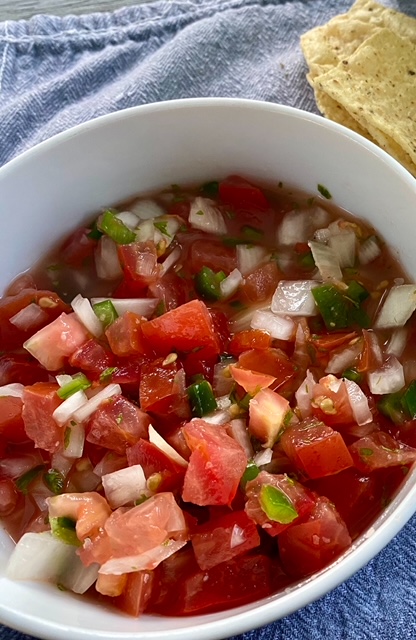
Fresh Garden Salsa


I can't even take credit for this recipe, it belongs to my husband.  He's been making it as long as I've known him, on the grilling holidays of summer and if we're really lucky--Superbowl Sunday.  

There are only a few ingredients, so everything should be super fresh from your garden, farmstand, or local grocer.  Make it in the morning and let it sit in the refrigerator so the flavors can marinate together until you're ready to serve it.  Tomatoes need a lot of salt, but only add a little when you make it or all the juices will render out and it will be a soggy, watery mess.  Finish it with course salt before serving and the flavors will pop on every tortilla chip you scoop, promise :)

-----------------------------------------------------------------------------

(WHAT YOU WILL NEED)

This is the base recipe.  Use as much of the ingredients as you like.  My daughter and I are salt-aholics, so we go crazy at the end but you're probably smarter and healthier.  I also load on the lime juice.  And you can easily make more by just doubling the ingredients--


3 or 4 ripe beefsteak tomatoes, chopped

1 small yellow onion, chopped

2-4 fresh serrano or jalapeno peppers, seeded and finely chopped

fresh cilantro or Italian parsley (or both), roughly chopped

salt

4 or 5 fresh limes, juiced.  You will also want the zest from one of them 

your favorite tortilla chips (I use the flat lime-flavored chips)


In a bowl, stir together the tomatoes, onion, chilies, herbs, sprinkling of salt, zest of one lime, and some of the freshly squeezed lime juice.  Cover and let sit in the refrigerator to blend flavors.

When ready to serve, remove from refrigerator and stir well.  Add some more of the lime juice (you may or may not use it all, depending on your preference) and sprinkle generously with salt to taste.  Serve with chips.


Wednesday, June 26, 2024

Roasted Okra


Fresh snacks are the best summer treats!

-----------------------------------------------------------------

(WHAT YOU WILL NEED)

fresh okra

olive oil

salt/pepper

garlic powder

cajun seasoning

your favorite buttermilk ranch for dipping


Preheat oven to 450 degrees

Wash and cut up your okra--I cut it into rounds, but the smaller ones I cut lengthwise and expose the pretty seeds.

Place cut okra in a bowl, drizzle with a small amount of olive oil to coat, and sprinkle on seasonings.  Mix and place on cookie sheet.


Bake at 450 degrees for approx 20 minutes until brown. They never get totally crispy because they're roasted (not fried) so they want to soften.  This is okay because the char will make the crunch.

Serve immediately with buttermilk ranch.  


Friday, May 24, 2024

Whiskey Sour


A whiskey sour is a treat anytime, but when you make it with fresh squeezed citrus, it's retro heaven!

I was given a juicer for Mother's Day and this is the first thing I did with it.  If you don't have one, don't worry--still plan on making this drink all weekend--I've been drinking them with sour mix for years and I've never met one I didn't like.  Just substitute the mix for the fresh juice and place fresh citrus slices in the drink.  So good!

----------------------------------------------------------

(WHAT YOU WILL NEED)

Makes (in my house) approx 3 drinks


electric citrus juicer

fresh lemons, limes, and oranges--enough to make 1/2 cup of juice each, plus some for garnish

1 cup sugar

1 cup water

your favorite bourbon (I use Maker's Mark)

maraschino cherries


First, make your simple syrup to slightly sweeten the drink:

In a pan on medium heat, heat the sugar and water until boiling.  Stir until the sugar dissolves completely and let cool.  Place in a jar with a tight fitting lid and keep in the refrigerator.

Squeeze lemons, limes, and oranges to get 1/2 cup of juice each, so you should have 1.5 cups of juice total.  Place in pitcher or mason jar and add 1/2 - 2/3 cup bourbon (depending on how strong you want them).  Taste the mix.  Add as much simple syrup as you want--you won't use all of it, but it keeps in the refrigerator for 2-3 weeks and can be used for other drinks like iced tea and coffee.  If your oranges are very sweet, you will use even less.  Plus, as the name itself suggests, it's supposed to be a little sour.


juiced fruit

Place in refrigerator to chill slightly.

When ready to serve, stir or shake mix and pour into glasses.  Garnish with fresh orange slices and maraschino cherries.  Retro heaven!  


Monday, February 5, 2024

Dinner Salad: roasted butternut squash, chicken, and toasted walnuts


I like dinner salads to be substantial, with the lettuce being just one of many ingredients, not the whole of it.  This salad is perfect for that and covers all the bases:  equal parts protein, cheese, dried fruit, chewy grain, roasted vegetable, toasted nuts, and lettuce—any combination of your favorites will do.  Sometimes I use chicken and squash, other times flaky tuna and tomatoes, or beef and asparagus.  Sometimes Arugula, other times Kale or romaine.  Use what you like and switch it up, you can’t go wrong 😊

 ------------------------------------------

(WHAT YOU WILL NEED)


The amount of ingredients depends on how big you want your salad, you decide

This is a quick, weeknight meal if you let the grocery store help you:


cubed butternut squash (I buy it already cut up in the produce section)

½ cup (when dried) cooked barley (would also be good with couscous, quinoa, or farro)

walnuts

dried cranberries 

cooked chicken, shredded (a rotisserie chicken from the deli is perfect here)

arugula (I buy it triple washed and ready to use)

swiss cheese, cubed

vinaigrette

olive oil

red wine vinegar

(maybe) 1 teaspoon Dijon mustard

salt/pepper

  • Cook your barley according to package directions and set aside to cool slightly.
  • Make your vinaigrette:  I like ¼ cup vinegar, 1/8 cup oil, and a teaspoon of mustard.  Add a pinch of salt and pepper and mix.  

When the barley is cooling, add a few teaspoons of the vinaigrette and mix, so it soaks up some of the flavor.

Preheat oven to 400 degrees.  Lay out your squash on a cookie sheet and drizzle with olive oil.  Mix with hands to coat and sprinkle with salt and pepper.

Roast in oven.  In the last 7 minutes of cooking, add the walnuts to the pan to toast.

 Let squash and nuts cool slightly; if walnuts are whole, chop them roughly and assemble your salad:

 Mix all ingredients together in a large bowl.  Dress with some (or all) of the vinaigrette.  Sprinkle with salt and pepper to taste.